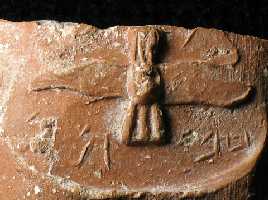
This holiday week afforded me the opportunity to get caught up on the documentation of LMLK handles I acquired earlier this year (like the spectacular #62 shown above), but have been too busy to accomplish. It seems simple enough, considering that the IAA-licensed antiquities dealers already provide at least 1 photo; just copy an existing web page, substitute the new photo, increment the Corpus total, & voila! Presto! Magic! Done in about 5 minutes! Right?
Well, if anyone else were managing the LMLK Research website, that might be how they do it, but that's not how I chose to do it since there's only 1 LMLK Research website. (The closest parallel is The Amphoras Project, founded on the work of Virginia Grace, which I only became aware of in 2005 while researching material for LMLK vol. 2.) I developed the method & techniques I presently use back in 2003 during my major research expedition to 3 Pennsylvania museums, & it hasn't changed much, so now's as good as ever to publish it.
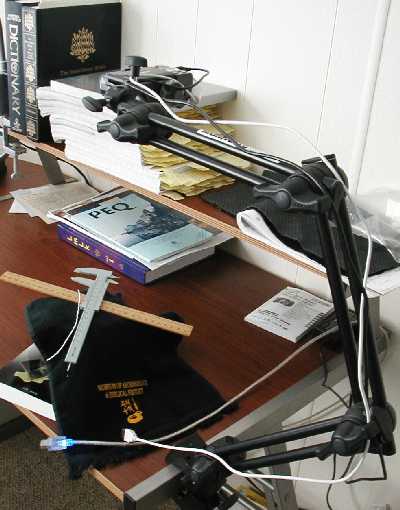
The black reticulated arm dominating this photo (the right wing of my L-shaped desk) is a $100 professional monopod that allows me to make minor adjustments to accommodate a wide variety of handle shapes/sizes. You would not believe what I used to go through. Prior to this, I kludged a monopod out of a computer-monitor paper-holder. In 2002 I never thought this research would amount to anything. And prior to that, I used a flatbed scanner. I never thought I'd see more than a handful of handles in my lifetime! God, was I ever wrong!
- Set up camera.
- Turn on mysterious background music (Gasparyan, Thornton/Ramzy, Vangelis, etc.)!
- Say a prayer.
- Set up handle for impression photos (5 minutes).
- Position the lens as close to the object as possible for the best magnification, but allow enough room for maneuvering a light source around it; about 10" is typical.
- Adjust the handle so its impression plane is parallel to the lens to eliminate as much distortion as possible; it's impossible to eliminate distortion for most impressions due the handle's curvature, & the stamper's tendency to stab at least one of its edges into the clay.
- Lights out; light on.
- Test shot.
- Shoot the seal (with apologies to animal-rights activists for the pun; 5 minutes).
- Shoot the handle (10-30 minutes).
- Check & rename the files (15-30 minutes).
- Backup the files.
- Analyze & measure the handle (15-30 minutes).
- Seal orientation.
- Ware color(s).
- Other marks (scrutinize the handle for incisions, fingerprints, or any anomalies).
- Left/right lengths (as viewed from the same isometric angle in the photos).
- Maximum jar-side length (an old-fashioned wooden inch-ruler is visible in the studio photo above).
- Handle width/thickness (at its smallest point near center of the loop where the break usually occurs)
- Hi/lo joint circumferences (measured with the white wire in the studio photo to approximate the amount of clay used to attach the handle to the jar, which is then straightened over the ruler)
- Loop circumference (again, at its smallest point near center of the loop where the break usually occurs)
- Loop opening (only available for complete handles; the minimum height/width inside using the gray caliper, also visible in the studio photo)
- Joint to seal (2 caliper measurements--1 from the approximate connection of the jar wall to the seal center, & another from the wall to the closest seal border; in some cases, I need to place my clear plastic template over the impression to estimate where these spots should be if they don't exist)
- Choose the best Seal photo. (5-15 minutes)
- Crop the Seal & reduce the Type photos (5 minutes).
- Crop the other handle shots (5-10 minutes).
- Move the cropped files & build a web page.
- Integrate links (5 minutes).
- Update the Corpus totals.
- Publish to the web.
- Brag.
With my new monopod, this process of setting up the camera will now only take about 15 minutes instead of an hour, including its connection to my computer.
It's important to set the mood, & keep me mindful of the long-range importance of this work in the history of the world. I hope that doesn't sound conceited, because I see myself as only one little link in a long chain that began with the prophet Isaiah, through King Hezekiah, his potters, the seal-officers, the farmers, carters (ancient truckers sans CB radios, but can you just imagine if they did have them--Breaker one-nine, what's the ten-twenty of the nearest kosher choke-n-puke?), to the Chronicler, the faithful scribes over the centuries, to Charles Warren, & so on through all the ~200 people who have published material related to this subject, plus the many unnamed excavators along with fellow collectors & museum curators who have preserved these artifacts of God's overall story. Naturally, when I visited the American institutions that store LMLK handles, I worked without this accompaniment!
I thank God for giving me good eyesight to be able to see these historical treasures, & I thank God for allowing me to handle these handles, which may have been attached to jars containing offerings presented in God's temple. Of course, when working as a guest in a museum, this step is performed before arriving or immediately upon leaving.
The vast majority of handles are fragmented, & are easy to set on a cushion; larger/complete handles are more complicated. But in either case, here are 2 important points:
To obtain the best shadows, I only photograph in the dark so I can control the angle of the light from a handheld source; an untangled extension cord is very helpful in maneuvering.
Kick-start the auto-focus, & select a computer folder to store the images in. Prior to my new camera this summer, I used to store all the images to its memory card, then transfer the files later. Now I can immediately preview them on the big screen. The old camera was 2 Megapixels; this new one's 10Mp. The best photos I could make with the old one were 1600x1200 pixels (400kb file size); this new one makes 3648x2736 (~4Mb).
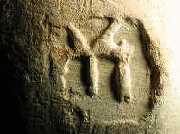
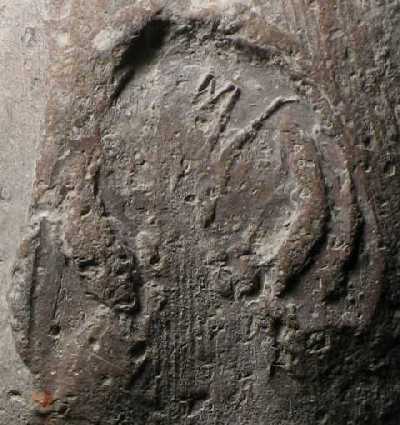
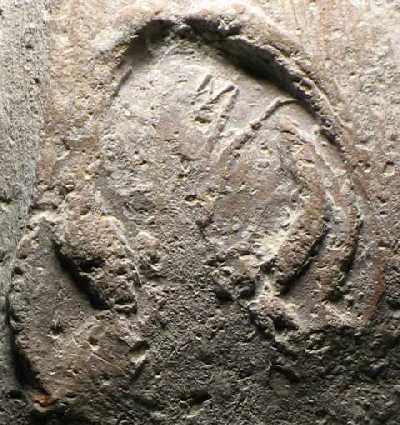
I take 8 shots using 8 lighting angles (45 degrees apart), & later label these files with suffixes according to cardinal points (N, NW, W, SW, S, SE, E, NE; when time is not an issue here at home, but only 2-4 shots at museums where my time was extremely limited). I used to have to shift the impression's location slightly for each shot because of the reaction by the camera's autofocus system to the varying light. This is not a big deal because the purpose of these shots is to capture the seal impression details--the color & texture of the handle are irrelevant. But with my new camera, which has better electronics & firmware, I've found that I don't need to move the handle to get decent shots; this will allow me to make animated files at some point (time permitting). But to illustrate the difference, here are 2 photos I took tonight of a Hellenistic handle's monogram seal (notice that the top one is flooded--this is the NE angle; the bottom one from the adjacent E angle has correct colors):
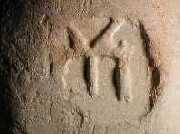
These 2 shots demonstrate the huge difference these 45-degree shifts can make in bringing out impression features--notice that the first one (NW) brings out fingerprint grooves in the middle where the scarab's body would've been, were the handle not concave here; yet in the 2nd photo from an adjacent angle (N), they completely disappear(!!!):
The amount of time this takes varies based on the shape/size of the handle (again, due to limited time at museums, I usually only took 2-4 basic shots of each handle, usually with no time to refine them). Small fragments that only need 4 shots don't require much special positioning--they set in the same basic position as for their seal shots. Large fragments that require top, bottom, side, left, right, & jar wheel-ring shots can take half an hour because of custom holders I build up from (clean) socks & black cloths. Unlike the previous step, here it's important to capture the color & texture of the handle as best as possible.
I take anywhere from 12 to 16 photos of each handle, & in some circumstances even more if it has an unusual/rare feature. The camera dumps them out with generic serialized filenames, & I have to add its main name plus descriptive suffixes. During this procedure, I'll open each one to do a cursory check of its condition. With the old camera, I occasionally had to re-setup the handle & re-shoot it; with the new camera, as mentioned earlier, I check each shot as it's taken.
This almost goes without saying, but at the end of each day, it's critical to copy the raw files to another device.
To avoid handling the handle in the future, I make a record of these parameters:
Out of the 8 shots with alternate lighting, determine which single photo to publish that gives researchers the best bang for their time-buck. Out of all the steps in the process, this is usually the most fun!
To help researchers do apple-to-apple comparisons, I resize all the seal photos to the same relative dimensions based on enlarged seal-design templates I place over my computer screen. The large photo on the handle's individual page has a maximum dimension of 480 pixels, & shows only the seal impression. Then for the seal-group pages, this same photo is reduced to a minimum dimension of 200 pixels & given a scientific classification name used later when doing statistical analyses. In some cases for unusual multi-stamped impressions, I do an extra step to estimate the correct reduction even though I include a larger minimum dimension to show the extra stamp. Out of all the steps in the process, this is the one that adds most value to the website, since it helps researchers identify partial stamps by comparing similar specimens. As the database has built up over the years, it's now much easier at a glance to distinguish an H2D from an H2U even if not a single trace of the "HBRN" inscription remains--the icon & "LMLK" inscriptions are extremely distinct.
This step takes a bit longer than the Seal photos since I resize the photos to match the measured dimensions; so even if I were to lose all my notes on the measurements, or even if the handles get lost or destroyed some day, I'd be able to cull the information from the photos (given that the computer screen is equivalent; a 16" diagonal at 1024x768; a standard I chose based on the most popular configurations in 2002 when I began this project).
This part is relatively easy once a template for the handle's owner is made; the photo files are deposited in the "dets" (Details) folder & the "imps" (Impressions) folders.
This part's a little more complicated since I have to add some text for the handle owner's page & the seal-group page, plus the Updates page announcing its addition.
This process is fairly fast nowadays, but required some development work over the years. I have several custom programs I created to count the file attributes for Inscriptions, Icons, Seal Designs, Orientation, Ware, & Incisions--this is where my Type-file naming conventions pay off bigtime! I also have a master database in an Excel worksheet to do additional calculations based on the provenanced & unprovenanced holdings.
It only takes a few minutes to break through all of my security settings, upload the files, then close the figurative security gates.
Actually, an additional step if I had time to spare, would be to create an overlay of the seal design on each main seal photo as I did for the S4L that Aren Maeir found earlier this year at Safi/Gath (I also did this for one of the still-unpublished Ramat Rahel handles found by Oded Lipschits).
So overall, I spend over 1 hour documenting each handle, sometimes 2 hours each (4 of the 9 done this week required special processing). Including this past week, I've now photographed 373 handles (or in the case of Haverford's collection, plaster casts of just the stamps).
The handles I documented this week brought the total number of pages on the Research site to 675. Since the handle-photo pages are the easiest & least time-consuming (since they don't require much thought or reading time), it would be equally fair to estimate the building of each page at a 2-hour minimum (some of them took over a week).
Using California's minimum wage of $6.75 since 2002 (which nobody in CA actually is paid; even burger flippers typically make a little more, & illegal immigrants, drug dealers, & panhandling bums make much more since they don't have to pay taxes) for 2 hours each, that amounts to almost $10,000 worth of work spread out over a 6-year period. (Did you notice the coincidence between 675 pages & $6.75? And some scholars say David & Solomon could not possibly have reigned for 40 years each! Ha! [And notice that the ANE-2 message I referenced was posted on 7-7-07.])
Not much in terms of dollars & cents (even if I were to use my actual engineering payrate), but I get to listen to really cool music while doing it, so it makes it worthwhile!
That's certainly a luxury Charles Warren never had when he published the first LMLK handle!
Song of the week: "Sayat Nova" by Djivan Gasparyan (click the song title to visit Amazon; click here for a 27-second sample; 360kb; note that Sayat-Nova, an 18th-century poet/musician, was known as the "King of Songs").
G.M. Grena

No comments:
Post a Comment