Just a quick note for posterity that today (July 30th, 2012), I executed a revocable living trust to transfer my property (including a bunch of broken jar handles) after my departure. And no, I don't expect to leave soon.
"Make me like a child of clay."
G.M. Grena
Monday, July 30, 2012
Sunday, July 22, 2012
Overlaid-Pixel-Color Sorting
Four score & 7 years ago, I learned about Polynomial Texture Mapping (PTM) at the West Semitic Research Center (as a guest of Dr. Bruce Zuckerman at the request of Dr. Gabriel Barkay who was in town at the time; it was an incredible privilege). After snapping multiple photos of an artifact using a variety of lighting angles, a Java-based program allows you to manipulate a single image as if you were shining your own light on it. The result is interesting, but the process is complicated, & to that end, discouraging.
I won't rehearse all the details here (see my 3-part blog entries from that time), but ever since then, the back of my mind has been wondering if there's a way to automatically generate a single optimum image of a seal impression. I envisioned a photo where the seal's most important/distinguishing features were highlighted with a bright color & outlined with a dark one (i.e., a wraparound shadow, something prohibited by the laws of physics).
In my previous entry, "Not a Handle Photo", I showed such an artificial image using Michael Welch's #195 handle. Israel Finkelstein (my newfound friend of a friend) even played an indirect role in inspiring this innovative endeavor, as I'll explain.
In the final edit of my 3rd article (recently) published on The Bible & Interpretation website, I cited a new article co-authored by Arie Shaus, Israel Finkelstein, & Eli Piasetzky: "Bypassing the Eye of the Beholder: Automated Ostraca Facsimile Evaluation" in MAARAV: A Journal for the Study of the Northwest Semitic Languages and Literatures 17.1 ("2010"; I put the year in quotes because it was actually published this year, but the Maarav publication schedule is lost in a time warp).
In this article (among other things), Shaus et al. show an alignment registration between 2 Arad ostraca photos & line-drawings of their respective inscriptions made by multiple scholars. Using image-editing software, they were able to stack each drawing atop the image, & numerically qualify the drawing's accuracy based on the visible clay surface or exposed ink.
My brain eventually made the connection between being able to analyze ostracon pixels & being able to analyze the colors of LMLK handle photos taken with alternate lighting angles (i.e., PTM). I spent the first half of our July 4th day off (from regular work) to see if I could construct a program that would do this, & obviously I was successful.
During the past week, "Pithom" posted a comment to my previous blog entry (WordPress version) speculating that I processed my photos using the Photoshop program, which is an industry-standard tool, "(or a similar software)". I used a very early version of Photoshop for a technical-writing job back in 1999, but I haven't touched it since.
I was curious if the current version (with more than a decade of technological advances) could do what I did, so I posted an inquiry on their website. One of their employees responded promptly explaining how it could be done, but the answer (as I expected) was that it doesn't do it. The Extended version sells for $999, but apparently I would also need a customized plug-in (cost unknown). This didn't surprise me as optimum seal-impression photos are not as u$eful in the real world as optimized celebrity photos.
Here is a composite image of 9 cropped & reduced photos of Mike's #195 (I felt it would be best to make this small version to fit in the standard blog width, but you can click on it to pop open a larger version for reference viewing):
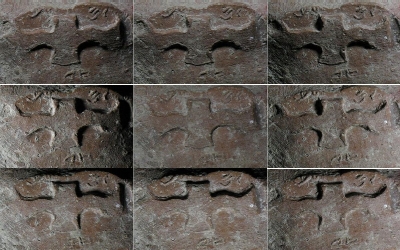
I arranged them in a 3x3 matrix according to the placement of my light source, which should be obvious from the shadows.
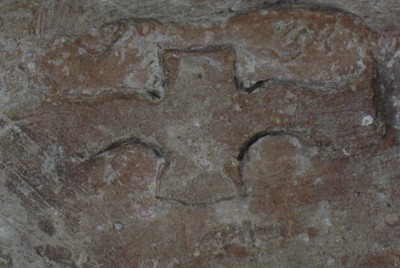
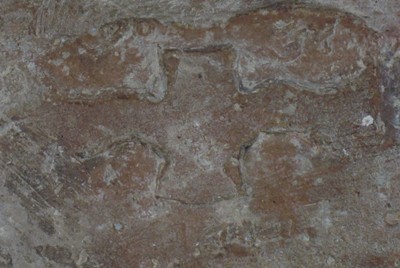
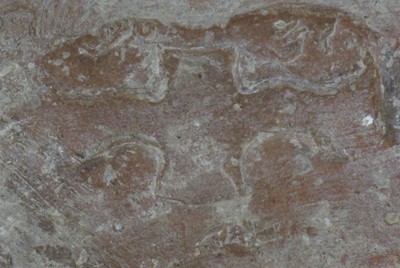
My program stacks/overlays the original photos, then allows me to generate a new image utilizing any of 6 general methods, some of which allow sub-methods. The first/main routine simply sorts the values for each pixel numerically, & allows me to choose the level. Here are all 9 from darkest to lightest:
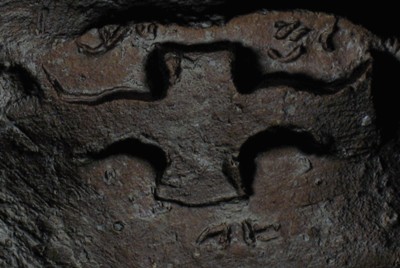
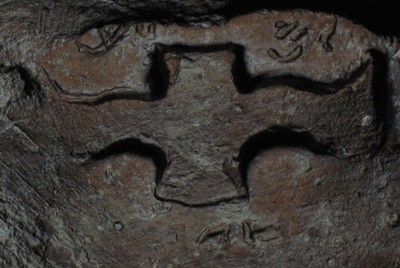

I want to emphasize that unlike the PTM software, which calculates what the programmer believes the object would look like if the light were illuminating the object & casting shadows from any particular angle; my OPCS s/w uses only real/actual pixel-color values from the original photos.
Notice that the Photoshop employee mentioned that the current version can do the extremes or middle, but not the in-betweens, & the one that seemed best for this particular handle (the one I posted last week in my teaser preview) was the next-to-darkest one. I suspected that would be the case when I began constructing the program since there would usually be a dark, shadow region for most of the pixels, but an optimal in-between level.
Despite the initial success with my original idea, my engineering curiosity led me to experiment with slightly more complicated methods of determining the optimum value for each pixel, just to be thorough. I'll show them here for amusement purposes. This first one simply takes an average value for the colors:
This one uses a standard deviation value (it didn't matter whether I calculated it as a full-population or representative-sample weight):
I named this routine "zig-zag" because I alternated between the brightest & darkest values for adjacent pixels:
Notice the nice icon outline, but washed-out inscription; similar results with the next-to-brightest, next-to-darkest zig-zag:
I called this one a "scroll" because I simply scrolled through the darkest-to-lightest values for contiguous pixels:
And a randomizer (randomly selecting any one of the overlaid pixel colors; the overall image didn't actually change much during subsequent iterations):

I simply don't have time to re-photograph all of my handles & process them, but suspect that a large quantity, though not a majority, would benefit from this process. Most of the existing photographs are already sufficient representatives, but it would be fun to see the OPCS versions.
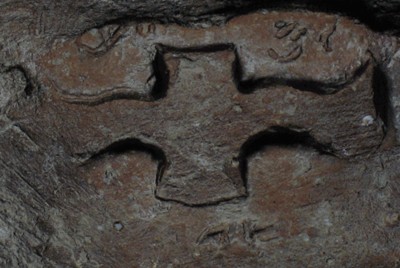
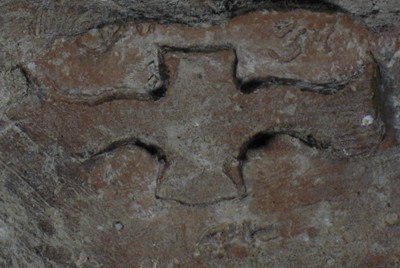
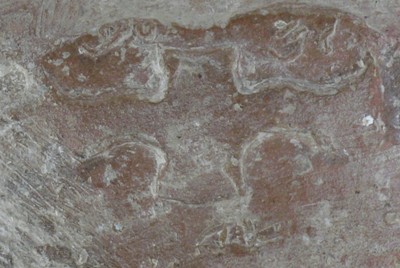
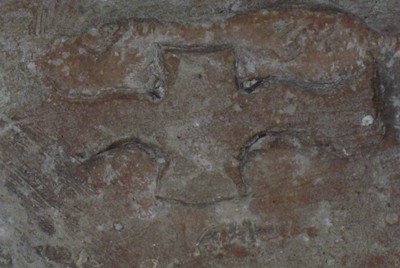
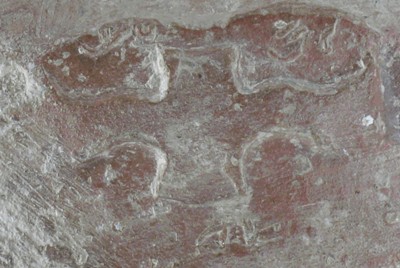
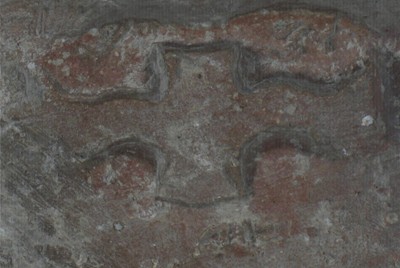
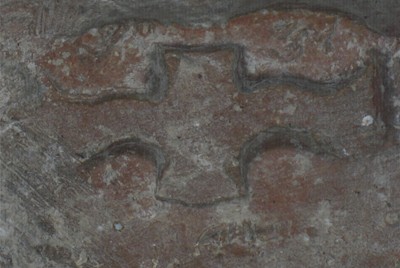
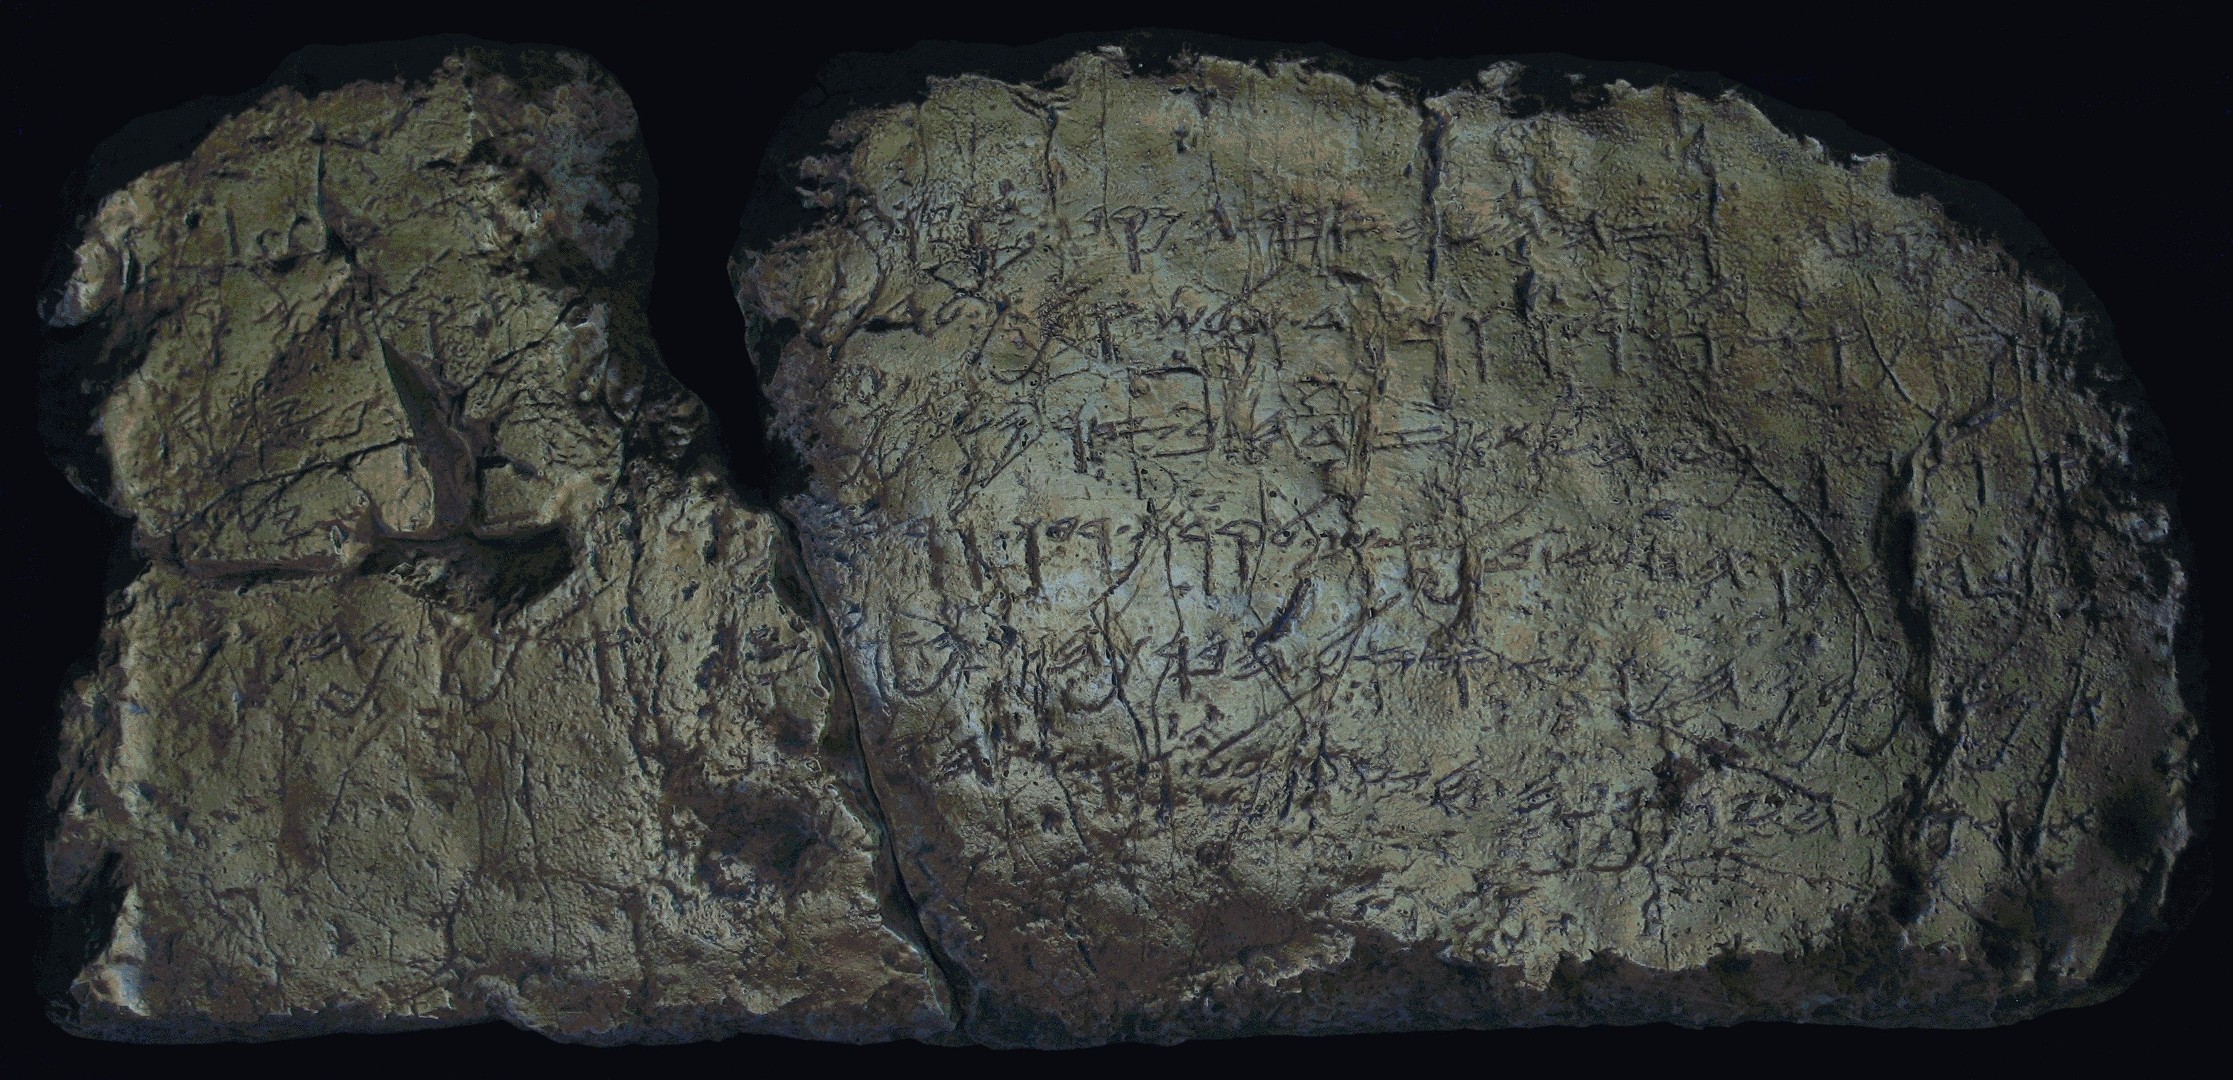
I chose Welch #195 because it had a mostly full icon & top/bottom inscriptions, all over a mostly flat plane/surface. In his comments/guesses, "Pithom" linked to my December 2007 post, "LMLK Handle Documentation Process", which included my #66 H4C with the disappearing fingerprint ridges. What you can't discern from a 2-dimensional representation is that the "LM" inscription rests in a canyon caused by a seal-stabbing depression that was shadowed in most of the photos, so its low-level OPCS didn't turn out well, though the multiple impressions of the seal border turned out excellent:
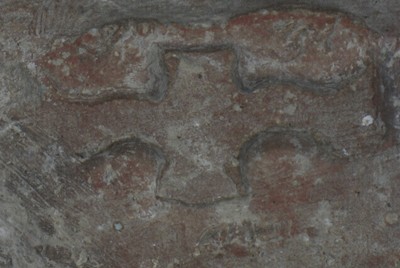
The best version of the inscription (showing each of the weird Mem strokes) came out in the brightest OPCS:
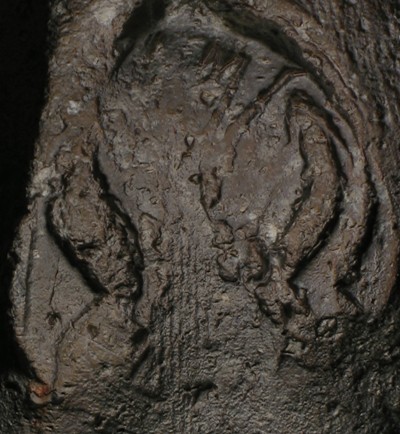
I also ran an experiment today on my Siloam Inscription replica, which represents an incision, or recessed feature, the opposite surface type from a seal impression. Here I hoped to show all the letters as blackened shadows (you can click this image to see a much bigger version):
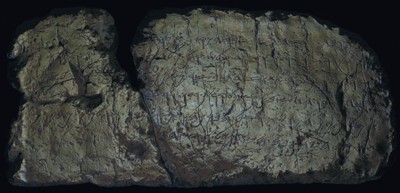
Of course the product of a replica can't be expected to match that of Sayce's from the original squeeze (especially with so many stray cracks & abrasions, which from an OPCS perspective are the things it's trying to highlight), but I feel a sense of accomplishment, & believe this tool will be a useful addition to future photography sessions.
G.M. Grena
I won't rehearse all the details here (see my 3-part blog entries from that time), but ever since then, the back of my mind has been wondering if there's a way to automatically generate a single optimum image of a seal impression. I envisioned a photo where the seal's most important/distinguishing features were highlighted with a bright color & outlined with a dark one (i.e., a wraparound shadow, something prohibited by the laws of physics).
In my previous entry, "Not a Handle Photo", I showed such an artificial image using Michael Welch's #195 handle. Israel Finkelstein (my newfound friend of a friend) even played an indirect role in inspiring this innovative endeavor, as I'll explain.
In the final edit of my 3rd article (recently) published on The Bible & Interpretation website, I cited a new article co-authored by Arie Shaus, Israel Finkelstein, & Eli Piasetzky: "Bypassing the Eye of the Beholder: Automated Ostraca Facsimile Evaluation" in MAARAV: A Journal for the Study of the Northwest Semitic Languages and Literatures 17.1 ("2010"; I put the year in quotes because it was actually published this year, but the Maarav publication schedule is lost in a time warp).
In this article (among other things), Shaus et al. show an alignment registration between 2 Arad ostraca photos & line-drawings of their respective inscriptions made by multiple scholars. Using image-editing software, they were able to stack each drawing atop the image, & numerically qualify the drawing's accuracy based on the visible clay surface or exposed ink.
My brain eventually made the connection between being able to analyze ostracon pixels & being able to analyze the colors of LMLK handle photos taken with alternate lighting angles (i.e., PTM). I spent the first half of our July 4th day off (from regular work) to see if I could construct a program that would do this, & obviously I was successful.
During the past week, "Pithom" posted a comment to my previous blog entry (WordPress version) speculating that I processed my photos using the Photoshop program, which is an industry-standard tool, "(or a similar software)". I used a very early version of Photoshop for a technical-writing job back in 1999, but I haven't touched it since.
I was curious if the current version (with more than a decade of technological advances) could do what I did, so I posted an inquiry on their website. One of their employees responded promptly explaining how it could be done, but the answer (as I expected) was that it doesn't do it. The Extended version sells for $999, but apparently I would also need a customized plug-in (cost unknown). This didn't surprise me as optimum seal-impression photos are not as u$eful in the real world as optimized celebrity photos.
Here is a composite image of 9 cropped & reduced photos of Mike's #195 (I felt it would be best to make this small version to fit in the standard blog width, but you can click on it to pop open a larger version for reference viewing):
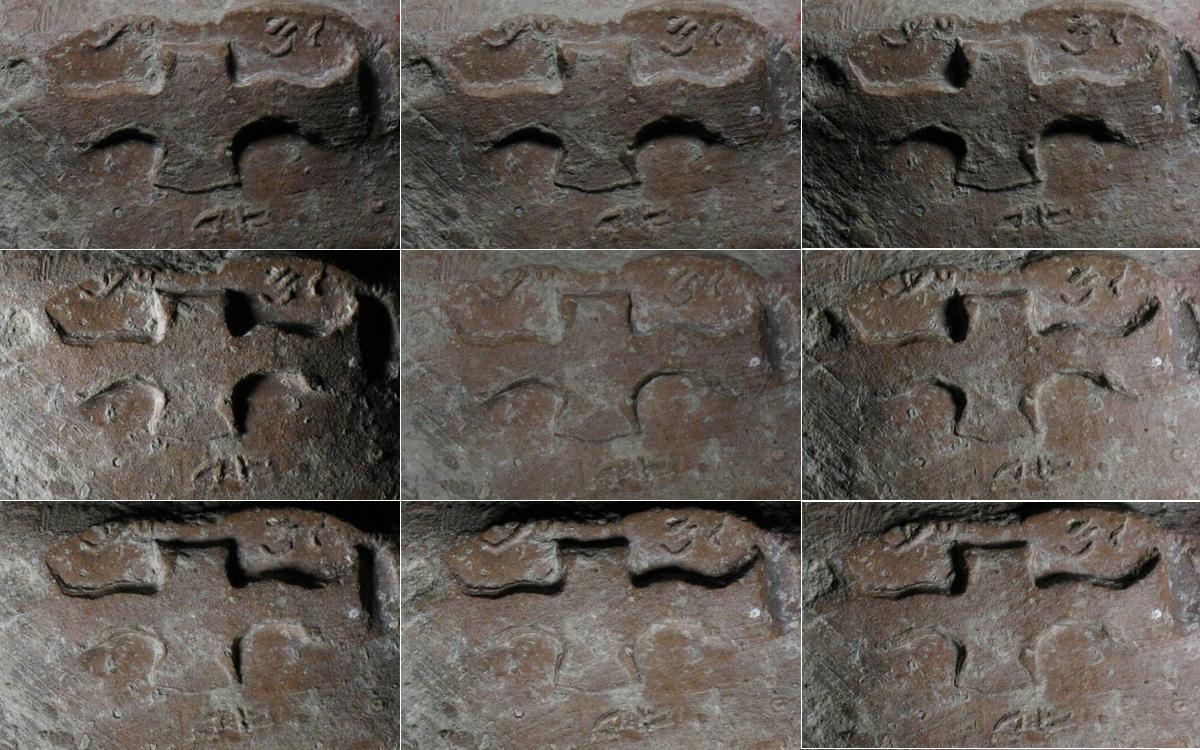
I arranged them in a 3x3 matrix according to the placement of my light source, which should be obvious from the shadows.
My program stacks/overlays the original photos, then allows me to generate a new image utilizing any of 6 general methods, some of which allow sub-methods. The first/main routine simply sorts the values for each pixel numerically, & allows me to choose the level. Here are all 9 from darkest to lightest:
I want to emphasize that unlike the PTM software, which calculates what the programmer believes the object would look like if the light were illuminating the object & casting shadows from any particular angle; my OPCS s/w uses only real/actual pixel-color values from the original photos.
Notice that the Photoshop employee mentioned that the current version can do the extremes or middle, but not the in-betweens, & the one that seemed best for this particular handle (the one I posted last week in my teaser preview) was the next-to-darkest one. I suspected that would be the case when I began constructing the program since there would usually be a dark, shadow region for most of the pixels, but an optimal in-between level.
Despite the initial success with my original idea, my engineering curiosity led me to experiment with slightly more complicated methods of determining the optimum value for each pixel, just to be thorough. I'll show them here for amusement purposes. This first one simply takes an average value for the colors:
This one uses a standard deviation value (it didn't matter whether I calculated it as a full-population or representative-sample weight):
I named this routine "zig-zag" because I alternated between the brightest & darkest values for adjacent pixels:
Notice the nice icon outline, but washed-out inscription; similar results with the next-to-brightest, next-to-darkest zig-zag:
I called this one a "scroll" because I simply scrolled through the darkest-to-lightest values for contiguous pixels:
And a randomizer (randomly selecting any one of the overlaid pixel colors; the overall image didn't actually change much during subsequent iterations):
I simply don't have time to re-photograph all of my handles & process them, but suspect that a large quantity, though not a majority, would benefit from this process. Most of the existing photographs are already sufficient representatives, but it would be fun to see the OPCS versions.
I chose Welch #195 because it had a mostly full icon & top/bottom inscriptions, all over a mostly flat plane/surface. In his comments/guesses, "Pithom" linked to my December 2007 post, "LMLK Handle Documentation Process", which included my #66 H4C with the disappearing fingerprint ridges. What you can't discern from a 2-dimensional representation is that the "LM" inscription rests in a canyon caused by a seal-stabbing depression that was shadowed in most of the photos, so its low-level OPCS didn't turn out well, though the multiple impressions of the seal border turned out excellent:
The best version of the inscription (showing each of the weird Mem strokes) came out in the brightest OPCS:
I also ran an experiment today on my Siloam Inscription replica, which represents an incision, or recessed feature, the opposite surface type from a seal impression. Here I hoped to show all the letters as blackened shadows (you can click this image to see a much bigger version):
Of course the product of a replica can't be expected to match that of Sayce's from the original squeeze (especially with so many stray cracks & abrasions, which from an OPCS perspective are the things it's trying to highlight), but I feel a sense of accomplishment, & believe this tool will be a useful addition to future photography sessions.
G.M. Grena
Saturday, July 14, 2012
Not a Handle Photo
Time for another riddle, which I will unravel in my next entry. For now, all I want to do is tease readers by saying that what you see below is not a photo of Michael Welch's #195 handle (nor is it a photo of the #195 impression for those who want to get technical):
Anyone who has photographed or studied photographs of seal impressions will readily acknowledge that what I said is true.
And this is not my favorite group, Heritage Singers, singing the title track from my favorite Heritage Singers album:
G.M. Grena
Anyone who has photographed or studied photographs of seal impressions will readily acknowledge that what I said is true.
And this is not my favorite group, Heritage Singers, singing the title track from my favorite Heritage Singers album:
G.M. Grena
Sunday, July 08, 2012
LMLK in Me
Probably due to increased physical exercise, I experienced some unusual medical symptoms at the end of May, which prompted some exhaustive tests. I'm ambivalent towards learning that all the results were negative (no disease or internal injury found) because it would be comforting to know exactly what caused the symptoms.
This was the first time I underwent a CT (computed tomography) scan, & it was actually fun to review the images of my abdominal region. Here's a sample:
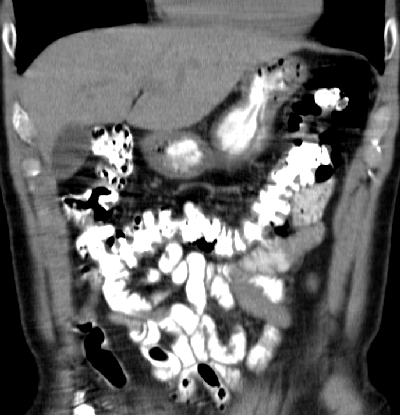
Now at least no one can legitimately accuse me of not having any guts!
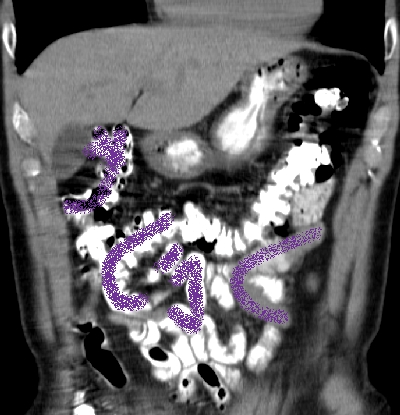
After studying all 202 slices from 3 dimensions, I chose this particular one because I think it indicates what caused my ill symptoms.
In the modified version below, I highlighted the apparent problems ... the long stroke of my Mem was way too vertical, & my Kaf was completely out-of-line with the other 3 letters.
One of my favorite pop songs from the 70s came to mind (lyrics composed by Tobias "Bias" Boshell, slightly modified by me):
"Ain't got no trouble in my life
No foolish dream to make me cry
I'm never frightened or worried
I know I'll always get by
I heat up, I cool down
When something gets in my way I go round it
Don't let life get me down
Gonna take it the way that I found it
I've got [lamelech] in me
I've got [lamelech] in me
I've got [lamelech] in me
They say that life is a circle
But that ain't the way that I found it
Gonna move in a straight line
Keeping my feet firmly on the ground
I heat up, I cool down
I've got words in my head so I say them
Don't let life get me down
Catch a hold of my blues, gonna play them
I've got [lamelech] in me
I've got [lamelech] in me
I've got [lamelech] in me
Feel funky, feel good
Gonna tell you I'm in the neighborhood
Gonna fly like a bird on the wing
Hold onto your hat honey - sing, sing, sing, sing"
"I will sing to the LORD while I live: I will sing praise to my God while I have my being" (Psalms 104:33; 146:2).
G.M. Grena
This was the first time I underwent a CT (computed tomography) scan, & it was actually fun to review the images of my abdominal region. Here's a sample:
Now at least no one can legitimately accuse me of not having any guts!
After studying all 202 slices from 3 dimensions, I chose this particular one because I think it indicates what caused my ill symptoms.
In the modified version below, I highlighted the apparent problems ... the long stroke of my Mem was way too vertical, & my Kaf was completely out-of-line with the other 3 letters.
One of my favorite pop songs from the 70s came to mind (lyrics composed by Tobias "Bias" Boshell, slightly modified by me):
"Ain't got no trouble in my life
No foolish dream to make me cry
I'm never frightened or worried
I know I'll always get by
I heat up, I cool down
When something gets in my way I go round it
Don't let life get me down
Gonna take it the way that I found it
I've got [lamelech] in me
I've got [lamelech] in me
I've got [lamelech] in me
They say that life is a circle
But that ain't the way that I found it
Gonna move in a straight line
Keeping my feet firmly on the ground
I heat up, I cool down
I've got words in my head so I say them
Don't let life get me down
Catch a hold of my blues, gonna play them
I've got [lamelech] in me
I've got [lamelech] in me
I've got [lamelech] in me
Feel funky, feel good
Gonna tell you I'm in the neighborhood
Gonna fly like a bird on the wing
Hold onto your hat honey - sing, sing, sing, sing"
"I will sing to the LORD while I live: I will sing praise to my God while I have my being" (Psalms 104:33; 146:2).
G.M. Grena
Subscribe to:
Posts (Atom)
